
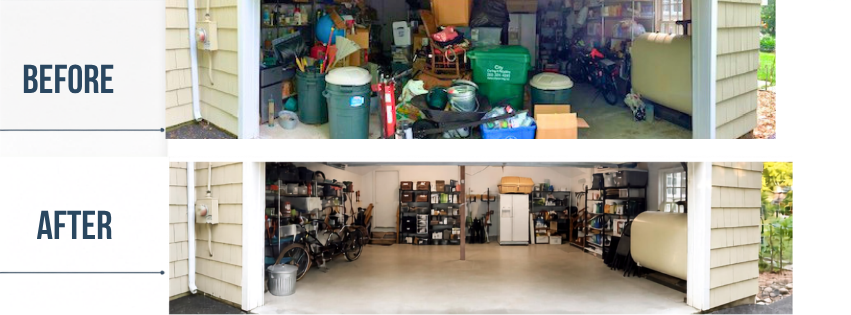
Whether you call it a berging, a schuur, a storage closet, or a garage, summer and autumn are the easier seasons to tackle it than the middle of a grey January. You’re not fighting the weather to prop the door open, and you’ve actually got the daylight to see what’s happening in the back corners.
As an opruimcoach and professional organizer in Amsterdam, I think the berging gets neglected for a simple reason: it’s the one space in the house you can close the door on and forget about. You open the door, wince, and close it again. Out of sight, out of mind — until you need the ladder, the suitcase, or the box of holiday lights, and suddenly you’re excavating. The berging doesn’t nag — it just quietly fills up until you need something specific and can’t find it.
A guide to organizing your storage space, step by step.
1. Empty Your Storage Space Completely
Or in sections, if that’s more realistic for the space you’ve got. An empty space reveals things a full one never will. One client had three sets of shelving racks, bought at different times, scattered around the garage wherever they’d fit. When we put everything back, we lined the matching styles up together along one wall and they created a long open shelf nobody knew was there — the exact spot for the skis that had been propped awkwardly in a corner for years.
2. Clean the Space and Check for Damp
While everything’s out, sweep the floor, wipe down the shelves, and check for damp or mold. A berging often goes unopened for months at a stretch, and that’s exactly the kind of space where a slow leak or a damp corner goes unnoticed until something stored there is ruined.

3. Gather Similar Items From Every Corner
Pull every extension cord into one pile, every holiday decoration into another, every camping item together. Working this way — by category across the whole space rather than one box at a time — is what surfaces the duplicates and near-duplicates you’d otherwise miss.
4. Joy-Check Every Category of Items
Once a category is gathered into one pile, go through it item by item and ask the same simple question each time: joy? Yes — keep. Joy? No — it goes. Genuinely unsure — park it in a separate pile and keep moving. Need an explanation on what it means to check if an item sparks joy – read in detail here. Once you’ve made it through everything else, return to the items you parked in the unsure pile for a joy check. The yes/no decision is easier to make at this point.
In a garage or berging, joy often feels like having exactly the right tool for a job. The wrench that fits, the level that’s actually level, the good pruning shears you reach for every spring. That’s joy too: the quiet confidence of having what you need, right where you expect it, when a problem comes up.

5. Identify Storage Zones for What You’re Keeping
Designate an area for each category or subcategory— sports, tools, garden, supplies — so every category gets one home instead of being scattered across three shelves and a corner. Leave a clear path to the back of the space while you’re at it. It sounds obvious until you’re the one climbing over the lawnmower to reach the suitcases every October.
Don’t be afraid to tweak storage locations further when you are all done if you realize you need more (or less) access to certain items
6. Use the Height of the Room
Shelves, racks, or hooks mean you’re not relying on floor space alone. Bikes and ladders can go on the wall, seasonal bins can go up high, and the floor stays clear for the things you actually reach for often.
Notice this step comes after the joy check and the zoning, not before. Once you know exactly what’s staying and how it’s grouped, you can choose storage solutions that are intentional — sized and placed for what they’ll actually hold — rather than buying shelving first and hoping it fits.

7. Label closed containers
If you can’t see into it, label it — bins, boxes, anything opaque. You shouldn’t have to bust out a memory to recall which box has the holiday lights and which has the camping gear.
8. Plan for what doesn’t go in the regular trash
Old paint, batteries, chemicals, electronics — these need a proper drop-off, not the curb. In the Netherlands that’s your local afvalpunt, and the details vary by municipality: what’s accepted, the opening hours, and often whether you’ll need to bring proof of address. Check your gemeente’s website beforehand so you’re not standing there with a can of old paint and no way to hand it over.
The Payoff
Finding your suitcase without an excavation. Realizing the eight half-used cans of paint in the corner aren’t usable anymore and can finally go — water-based latex and acrylic paint doesn’t last nearly as long as people assume once it’s opened, especially somewhere with the temperature swings a berging tends to have. And an actual mental inventory of what’s in there, instead of a vague sense of “probably something.”
A good berging lets you walk in, find what you need in under a minute, and put it back exactly as easily. Garage organization, storage closet reset, berging opruimen — whatever you call the project, the payoff is a space you actually trust: one less thing quietly weighing on you, and room to spare for what comes next.
Continue Reading
If you found this article valuable, you might also like:
- Decluttering Later in Life— Let go of things that no longer spark joy and enjoy doing it.
- When to hire a professional organizer — Spoiler alert – when YOU want to get organized.
Enjoyed this article? I’m Sheila, a Certified KonMari® Consultant and professional organizer / opruimcoach based in Amsterdam. Every month I share practical organizing tips, thoughtful insights, and encouragement to help you create a home that supports the life you want to live.
Sign up here and get organizing inspiration without adding to your clutter pile!